How to Fix Typos and Create Social Media Announcements for Medium Articles with Python and ChatGPT?

In the previous article, I explained how to build a CI/CD pipeline for the article-improver Python application. But some application features weren’t fully implemented to enable article-improver‘s use for Medium article editing, so let’s fix it.
In short — this article will explain how to implement:
- Typos fixing for Medium article. ChatGPT will be used for typos fixing.
- Generating Medium article announcement posts for Twitter and LinkedIn (this is a new feature I decided to add). ChatGPT will be used for creating these announcements.
These features will be explained in this Python ChatGPT tutorial. So, let’s start coding 🔥.
Table of Content
This article is a part of the article-improver series:
- The Guide to Developing a Python CLI Application with ChatGPT
- How to Implement CI/CD for Python Command-Line Applications with GitHub Actions?
So it make sense to check those articles before this one.
Preparation
Create a new repository from https://github.com/vitalii-honchar/article-improver-ci-cd-tutorial Changes from this section are available on GitHub.
Adding new commands in an article-improver
First feature — fix typos in an article. The article-improver CLI should read the PDF file with an article and propose typos fixes by utilizing the power of ChatGPT. The output of the article-improver CLI app at the end of this section should be like this:
Loading...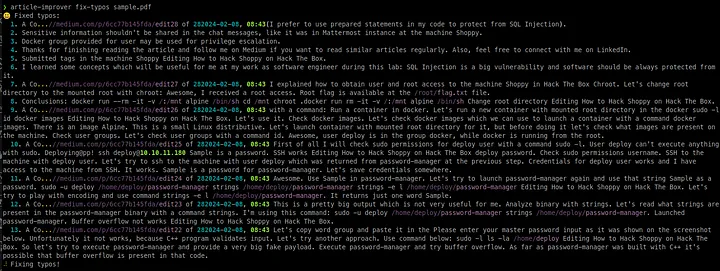
An output of the command fix-typos will contain sentences with fixed typos in them. A user of article-improver can then copy the fixed sentence from stdout and paste it in the Medium post.
1. Create the file fix_typos.py
Create a new Python file fix_typos.py in the package command with the following content:
1from article_improver.chat_gpt import ChatGpt
2
3async def handle(chat_gpt: ChatGpt, filename: str):
4    pass
The result should looks like this:
Loading...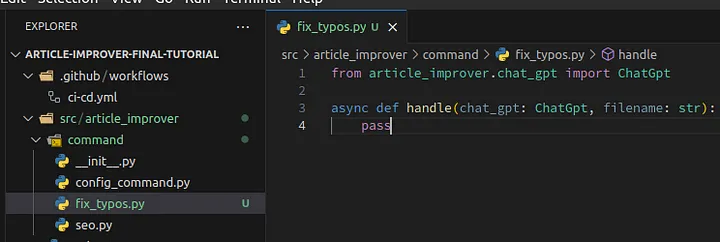
2. Creating the fix-typos command
Next, edit main.py with adding a new function to it with the following content:
1from article_improver.command import fix_typos
2
3@app.command(name="fix-typos")
4def fix_typos_command(filename: str):
5    async def cmd():
6        await fix_typos.handle(chat_gpt, filename)
7
8    execute_chat_gpt_command("Fixing typos!", cmd)
The result should looks like this:
Loading...
After this, the command article-improver fix-typos should start working and doing nothing. The changes of these sections are available on GitHub.
3. Refactoring of the Python project
To keep maintenance costs low for the article-improver project, we need to refactor it first.
I will explain what maintenance is and why we need to keep it cost-effective in the next article. For now, just keep in mind that cheap maintenance means quickly adding new features and fixing bugs. Expensive maintenance is the opposite — taking a long time to fix bugs and add new features.
- Create a package
chat_gptwith fileschat_gpt.pyandcompressor.py. Copy and paste content from the GitHub repository. - Delete the file
article_improver/chat_gpt.pyand in all its dependencies import filechat_gpt/chat_gpt.pyinstead. An example of this change is here. - Delete the function
compressfrom the filecommand/seo.py. Import that function from the filechat_gpt/compressor.pyinstead, as shown in the example. - Create a file
article_improver/output.pywith the content from GitHub. - Delete the function
print_fieldfrom the filecommand/seo.pyand import the moduleoutputin the filecommand/seo.py. An example of an import is available on GitHub. Use theoutputmodule in the filecommand/seo.pyas shown on GitHub.
After this step, the project structure should looks like this:
Loading...
Content from this step is available on GitHub.
4. Implementing the ChatGPT fix-typos command
Let’s implement the fix-typos command to quickly fix typos in Medium articles by replacing the content of the fix_typos.py file with the following:
1from article_improver.chat_gpt.chat_gpt import ChatGpt, MODEL_GPT_3, MAX_TOKENS
2from article_improver.chat_gpt.compressor import compress_with_saving_punctuation
3from article_improver import pdf, output
4import json
5import re
6
7FIELD_TEXT = "text"
8
9PROMPT = f"""
10As an SEO optimization assistant, your task is to evaluate an article provided within triple quotes. Analyze typos in the text and provide fix for the typos:
11
121. Fixed text without explanation of mistakes.
13
14Please format your response as a JSON object with the following fields:
15- "{FIELD_TEXT}": A fixed text in the format of string array where each element is separate sentence. Example: ["The fixed sentence 1.", "The fixed sentence 2!"]
16Ensure the response excludes extraneous formatting or labels, presenting only the JSON object for direct usability in Python.
17"""
18
19REGEX_SPLIT_TO_SENTENCES = r"(?<=\w)[.!?;:](?=\s|$)"
20
21
22def convert_to_sentences(content: str) -> list[str]:
23    sentences = re.split(REGEX_SPLIT_TO_SENTENCES, content)
24    return [sentence.strip() for sentence in sentences if sentence.strip()]
25
26
27def create_batches(content: str, model: str) -> list[str]:
28    sentences = convert_to_sentences(content)
29    if len(sentences) == 0:
30        return []
31
32    max_tokens = MAX_TOKENS[model]
33    batches = []
34
35    while len(sentences) > 0:
36        next_sentence = sentences.pop()
37        if len(batches) == 0 or len(batches[-1] + next_sentence) >= max_tokens:
38            batches.append(next_sentence)
39        else:
40            batches[-1] += next_sentence
41
42    return batches
43
44
45async def handle(chat_gpt: ChatGpt, filename: str):
46    content = compress_with_saving_punctuation(pdf.read_pdf(filename))
47    batches = create_batches(content, MODEL_GPT_3)
48
49    for batch in batches:
50        completion = await chat_gpt.get_completion(PROMPT, batch, MODEL_GPT_3)
51        completion_json = json.loads(completion)
52        output.print_list_field(":smiley: Fixed typos", FIELD_TEXT, completion_json)
An explanation:
FIELD_TEXT— the constant which specifies which field should return ChatGPT in the response.PROMPT— the constant with a prompt for ChatGPT. Pay an attention to how theFIELD_TEXTconstant is used in thePROMPTconstant. Instead of copying and pasting code, theFIELD_TEXTconstant is used, following the DRY (Don’t Repeat Yourself) principle.REGEX_SPLIT_TO_SENTENCES— the regex which splits text into sentences.convert_to_sentences— the function which simplit splits text into sentences using theREGEX_SPLIT_TO_SENTENCESregex.create_batches— the function that creates batches for the specified ChatGPT model from the text.handle— the function which executes thefix-typoscommand.
The fix_typos.py file should looks like this:
Loading...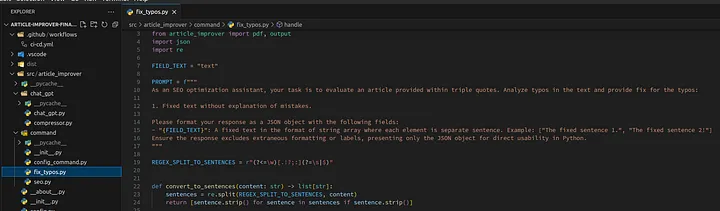
Before we go to the testing this command, let’s take a closer look to the create_batches function:
1def create_batches(content: str, model: str) -> list[str]:
2    sentences = convert_to_sentences(content)
3    if len(sentences) == 0:
4        return []
5
6    max_tokens = MAX_TOKENS[model]
7    batches = []
8
9    while len(sentences) > 0:
10        next_sentence = sentences.pop()
11        if len(batches) == 0 or len(batches[-1] + next_sentence) >= max_tokens:
12            batches.append(next_sentence)
13        else:
14            batches[-1] += next_sentence
15
16    return batches
This function splits the provided text to the batches with sentences. An input in the content argument may be a simple string:
1"Sentence 1. Sentence 2! Sentence 3?"
An output for that input will be a list of strings:
1[
2  "Sentence 1Sentence 2",
3  "Sentence 3"
4]
We need to batch because ChatGPT 3 has a 4096 token limit, which means we can’t pass the full article to it for typo fixing. Additionally, if we try to send every sentence separately to ChatGPT, it may cost too much money due to the high number of requests per second (RPS). We could also reach the RPS limit, causing ChatGPT to stop handling our requests. Therefore, there are several problems without batching.
That’s why I implemented batching based on the sentences and token limit for ChatGPT 3. For fixing typos, we don’t need the capabilities of ChatGPT 4, which even work longer, so ChatGPT 3 is a good enough solution here.
Let’s test the fix-typos command on the sample.pdf file:
1hatch run article-improver fix-typos sample.pdf
An output should be like this:
Loading...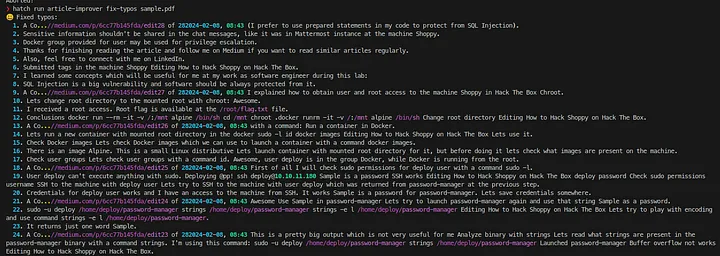
We have a couple of numbered batches where each number represents a separate sentence. This makes fixing articles convenient and is a great example of content improvement with ChatGPT.
The code of this section is available on GitHub.
5. Implementing the ChatGPT created announcements command
Next, let’s implement the announcements command, which will help our users generate an announcement message about a new article.
Create the announcements.py file in the command module with the following content:
1from loguru import logger
2from article_improver.chat_gpt.chat_gpt import ChatGpt, MODEL_GPT_4
3from article_improver.chat_gpt.compressor import compress
4from article_improver import pdf, output
5import json
6
7FIELD_TWITTER = "twitter"
8FIELD_LINKEDIN = "linkedin"
9
10
11PROMPT = f"""
12As an SEO optimization assistant, your task is to evaluate an article provided within triple quotes. Analyze the technical accuracy of the content and its alignment with SEO best practices. Your analysis should culminate in the provision of:
13
141. Five announcements of a new article as the Twitter tweet with limit 30 words.
152. Five announcements of a new article as the LinkedIn post with limit 30 words.
163. Include a place for the link to an article in every announcement.
17
18Please format your response as a JSON object with the following fields:
19- "{FIELD_TWITTER}": An array of strings with announcements for Twitter. Example: ["Announcement 1", "Announcement 2"].
20- "{FIELD_LINKEDIN}": An array of strings with announcements for LinkedIn. Example: ["Announcement 1", "Announcement 2"].
21Ensure the response excludes extraneous formatting or labels, presenting only the JSON object for direct usability in Python.
22"""
23
24
25async def handle(chat_gpt: ChatGpt, filename: str):
26    content = compress(pdf.read_pdf(filename))
27    completion = await chat_gpt.get_completion(PROMPT, content, MODEL_GPT_4)
28
29    completion_json = json.loads(completion)
30
31    output.print_list_field(
32        "💣 LinkedIn announcements:", FIELD_LINKEDIN, completion_json
33    )
34
35    output.print_list_field("🔥 Twitter announcements:", FIELD_TWITTER, completion_json)
This handler simply reads the PDF file and uploads its content to ChatGPT 4 with the prompt to generate announcement messages for LinkedIn and Twitter.
The file should looks like this:
Loading...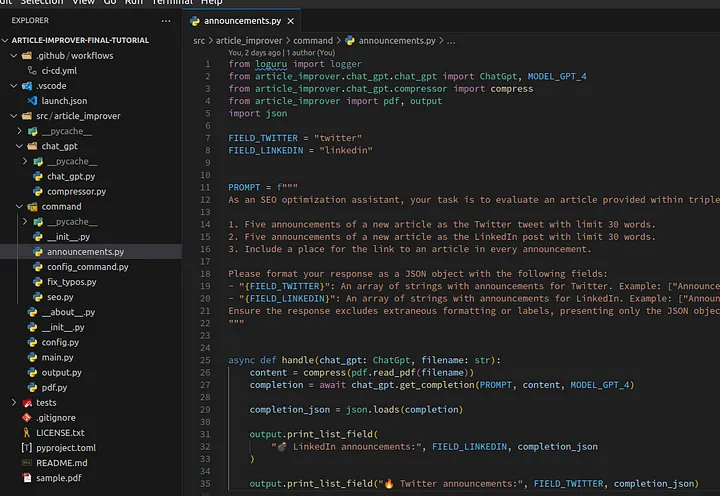
Next, simply update the main.py file by adding this function:
1@app.command(name="announcements")
2def create_announcements_command(filename: str):
3    async def cmd():
4        await announcements.handle(chat_gpt, filename)
5
6    execute_chat_gpt_command("Creating announcements!", cmd)
7
And replace import line:
1from article_improver.command import config_command, seo, fix_typos, announcements
Let’s test our new command with the command:
1hatch run article-improver announcements sample.pdf
The result of its execution should be like this:
Loading...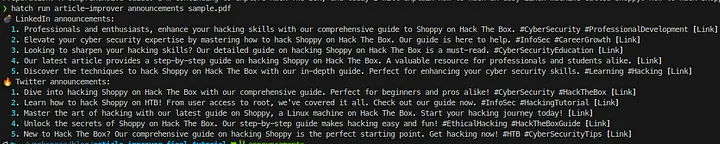
The content of this section is available on GitHub.
6. Fix code style
Code style is very important for futher project support, so let’s fix it with the Python code formatter [black](https://github.com/psf/black) by using the command:
1black .
After this, commit all changed Python files and push them to GitHub.
Add documentation
1. Add commands explanation in the help command
We added all three commands for the article-improver CLI application:
seo— proposes SEO optimized titles and provide a mark for an article.fix-typos— fixes typos in an article per sentence.announcements— creates an announcement messages for LinkedIn and Twitter.
We can use our application, but our users don’t know how to use it because even if users install our application and run the command:
1article-improver --help
Then they will see just list of commands without any explanation, as shown in the screenshot below:
Loading...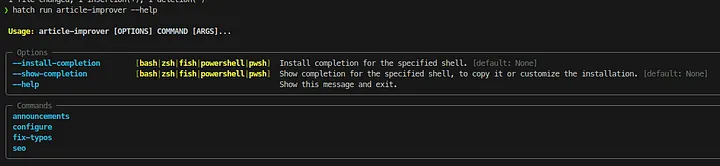
Such behaviour is not user friendly, so let’s fix it by adding documentation to our functions. Edit the main.py file and add documentation to every function which represents a command. Use the following content:
1@app.command(name="seo")
2def seo_command(filename: str):
3    """
4    Provides SEO optimized titles for an article from the PDF file.
5    """
6
7
8@app.command(name="fix-typos")
9def fix_typos_command(filename: str):
10    """
11    Fixes typos in an article from the PDF file.
12    """
13
14
15@app.command(name="announcements")
16def create_announcements_command(filename: str):
17    """
18    Creates announcements for LinkedIn and Twitter from an article in the PDF file.
19    """
20
21
22@app.command(name="configure")
23def configure_command():
24    """
25    Generates or regenerates configuration file.
26    """
After these changes, when a user will run the help command:
1article-improver --help
The output will contain the description of every command:
Loading...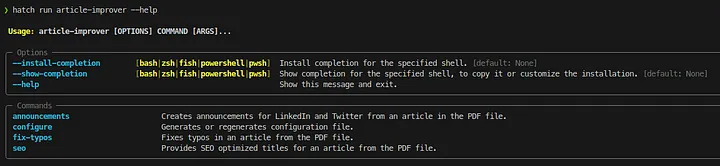
The content of this section is available on GitHub.
2. Add README.md
While the --help command is very helpful for users who already have the article-improver application installed on their machines, for new users, its still not clear what the repository article-improver on GitHub does.
Loading...
We need to fix it and explain the purpose of this application and it’s possible commands. Let’s do it by replacing README.md with the following content:
1# article-improver-tutorial
2
3---
4
5This is a repository for Medium tutorial article.
6
7## article-improver
8
9`article-improver` - is a CLI application which uses ChatGPT to improve Medium article provided in the PDF file.
10
11Commands of an application:
12
13- `seo ` - proposes SEO optimized titles and provide a mark for an article.
14- `fix-typos ` - fixes typos in an article per sentence.
15- `announcements`  -  creates an announcement messages for LinkedIn and Twitter.
16- `--help` - prints help for this application.
17
18## License
19
20`article-improver-tutorial` is distributed under the terms of the [MIT](https://spdx.org/licenses/MIT.html) license.
The README.md file should looks like this:
Loading...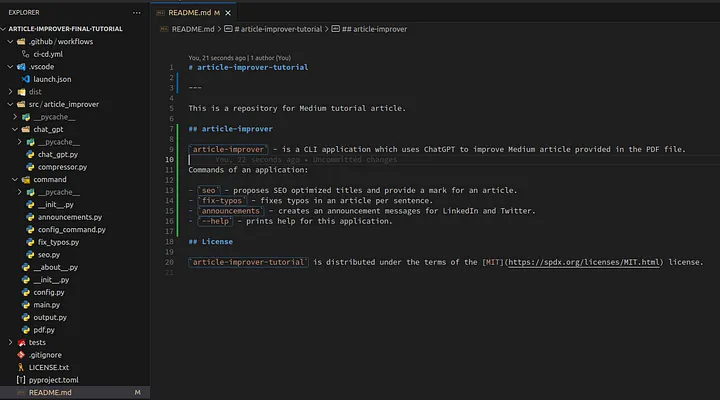
That’s it. Just commit and push these changes to GitHub. Right now, our users can get an idea what to expect from this repository by reading README.md:
Loading...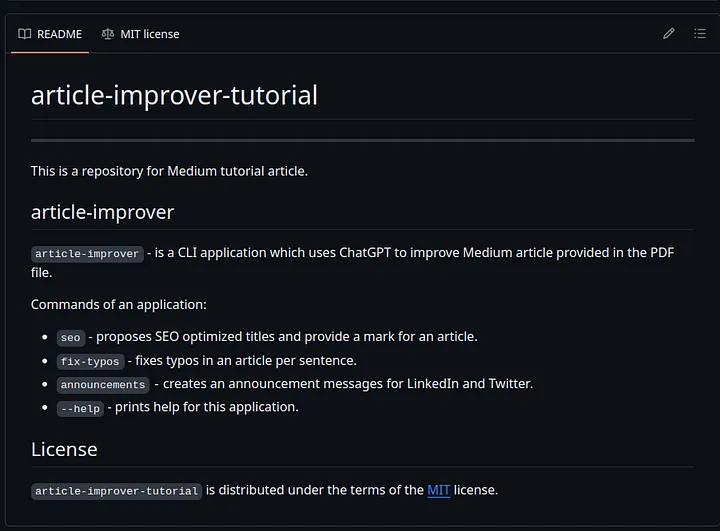
The content of this section is available on GitHub.
Try to always include documentation in your software. This makes it easier for users to use it.
Conclusions
In this article, I explained how to add two commands to the article-improver application:
fix-typos— fixes typos per sentence in the PDF file. This command is an example of the power which provides ChatGPT for content creators.announcements— this command generates LinkedIn and Twitter announcements with ChatGPT.
Also, I explained how to document the article-improver application commands and why it is important to do so.
📧 Stay Updated
Get weekly insights on backend development, architecture patterns, and startup building directly in your inbox.
Free • No spam • Unsubscribe anytime
Share this article
Related articles
LLM Prompt Evaluation with Python: A Practical Guide to Automated Testing
Learn how to evaluate LLM prompt quality using Python with practical examples from an open-source AI product research project. Discover automated testing techniques to ensure consistent, high-quality outputs from your AI applications while minimizing costs.
How I Built an AI-Powered YouTube Shorts Generator: From Long Videos to Viral Content
Complete technical guide to building an automated YouTube Shorts creator using Python, OpenAI Whisper, GPT-4, and ffmpeg. Includes full source code, architecture patterns, and performance optimizations for content creators and developers.
