How to Implement CI/CD for Python Command-Line Applications with GitHub Actions?

In this article, I will explain the difference between CI and CD and how to build a CI/CD pipeline for a Python application using GitHub Actions.
The knowledge about CI/CD is especially important for software engineers nowadays with the movement towards a no QA environment and requirements to deliver software as fast as possible and with high-quality standards.
Introduction
Before starting to add CI/CD, let’s understand why it’s an important topic in nowadays software development.
- CI — continuous integration, this is a process of automated testing newly added changes to the project. When a developer commits changes in the project and pushes them to the GitHub repository, automated tests should run and tell if these changes are good (tests passed) or bad (tests failed). To implement continuous integration (CI), it’s necessary to add automated tests to your project (unit tests, integration tests, end-to-end tests). Without added tests, CI does not work and manual testing is required.
- CD — continuous delivery, this is a process of automated deploying or providing the latest valid software to our clients. This process, continuous delivery (CD), always runs after continuous integration (CI) pipeline because only CI can tell if the latest changes are valid or not by passing tests. In software development, providing software for client usage is termed as “delivery”. To implement CD, changes which developers added in the project should be atomic and incrementing, to make it possible to deliver every merged PR to clients.
There are many ways to implement CI/CD pipelines, but in this article, I will consider GitHub Actions as one of the most popular tools nowadays. So, from the definition of CI/CD, we should implement:
- Test stage which will run when a developer pushes changes to the GitHub repository. This is continous integration (CI) pipeline.
- Delivery stage which will run after passed tests. This is continuous delivery (CD) pipeline.
That’s all theory, let’s jump to the coding 🔥.
Preparations
First of all, let’s prepare the project for which we will build a CI/CD pipeline. In the previous article The Guide to Developing a Python CLI Application with ChatGPT, I explained how to build a CLI application. Let’s use the project from that article to build a CI/CD pipeline.
1. Clone the repository on GitHub
Click on the Code button and copy the SSH URL to the clipboard as shown in the screenshot below.
Loading...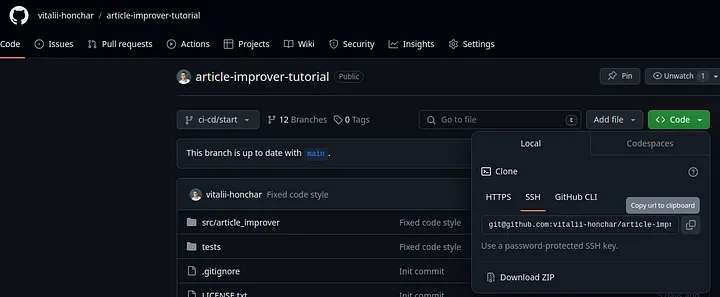
Next, execute the command:
1git clone git@github.com:vitalii-honchar/article-improver-tutorial.git
The result of command execution is this:
Loading...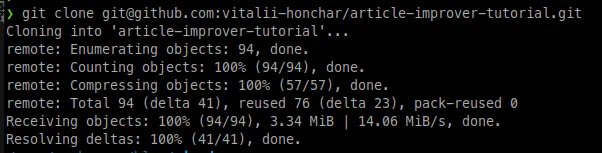
2. Remove the .git folder in the repository
Change directory to the clonned repository:
1cd article-improver-tutorial
And execute the command:
1rm -rf .git
This command will remove all information about the Git repository, so we can create a new Git repository on GitHub to implement CI/CD pipeline from scratch.
3. Init a new repository
Execute the command:
1git init
And execute the command:
1git add . && git commit -m "Init commit"
This will add all files to the Git and commit them.
4. Create a new repository on GitHub
Let’s create a new repository on GitHub by going to your profile and clicking on the tab Repositories as shown in the screenshot below.
Loading...
Click on the New button on the right part of the screen and fill it with content from the screenshot below:
Loading...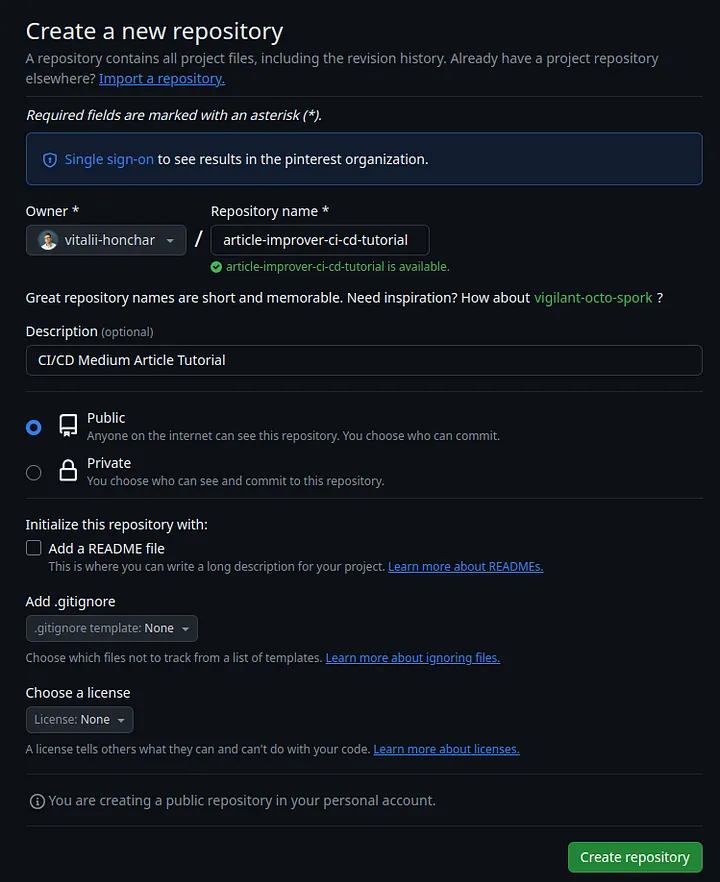
After that, just click on the Create repository button.
5. Push local repository to GitHub
Next, simply copy commands from the push an existing repository from the command line section as shown in the screenshot below.
Loading...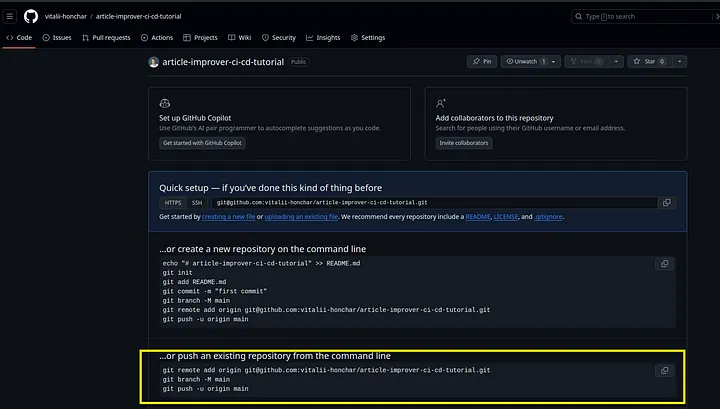
The result of commands execution should be like this:
Loading...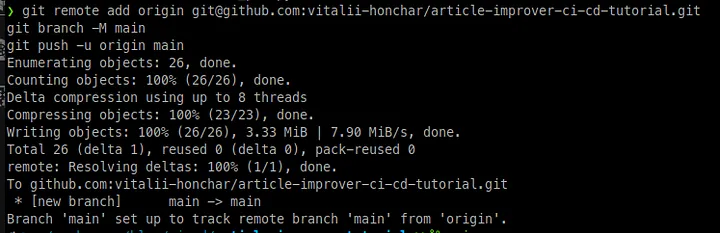
And after refreshing the GitHub page, changes should be available on GitHub as shown in the screenshot below.
Loading...
That’s it — we created a fresh repository with Python project, and now we are ready to add CI/CD to it.
Implementation
1. GitHub Actions workflows folder
First of all, let’s create the GitHub Actions workflows folder by creating:
- The folder
.githubin the root of the repository. - The folder
workflowsin the.githubfolder.
You can use the command for this:
1mkdir -p .github/workflows
The result of the command execution should be like this:
Loading...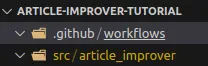
2. Test Job
Next, let’s create a file ci-cd.yml in the folder workflows with the following content:
1name: ci-cd
2run-name: Build article-improver 🚀
3
4on:
5  push:
6    branches:
7      - main
8  pull_request:
9    branches:
10      - main
11
12jobs:
13  test:
14    runs-on: ubuntu-latest
15    steps:
16    - uses: actions/checkout@v3
17    - name: Set up Python
18      uses: actions/setup-python@v4
19      with:
20        python-version: '3.11'
21        cache: 'pip'
22    - name: Install Hatch
23      run: |
24        python -m pip install --upgrade pip
25        pip install hatch
26    - name: Run tests
27      run: hatch run test
name— the name of this GitHub Actions workflow.run-name— the name which will be displayed on the details page of the GitHub Actions workflow.on.push.branches— trigger this workflow only on pushing commits to specified branches, in our case this is only themainbranch; all other branches will not trigger this workflow.on.pull_request.branches— trigger this workflow only on the created pull request to specified branches, in our case, this is only themainbranch.jobs— this is a section with jobs which will be executed during this workflow.test— the job which will run all tests in the project.runs-on: ubuntu-latest— specifying which OS we need to use for thetestjob.name: Set up Python— configure Python for thetestjob.name: Install Hatch— install Hatch.name: Run tests— run tests.run— this is a section in the step specification which executes a bash command, for examplehatch run test. The command may any.
It should looks like this:
Loading...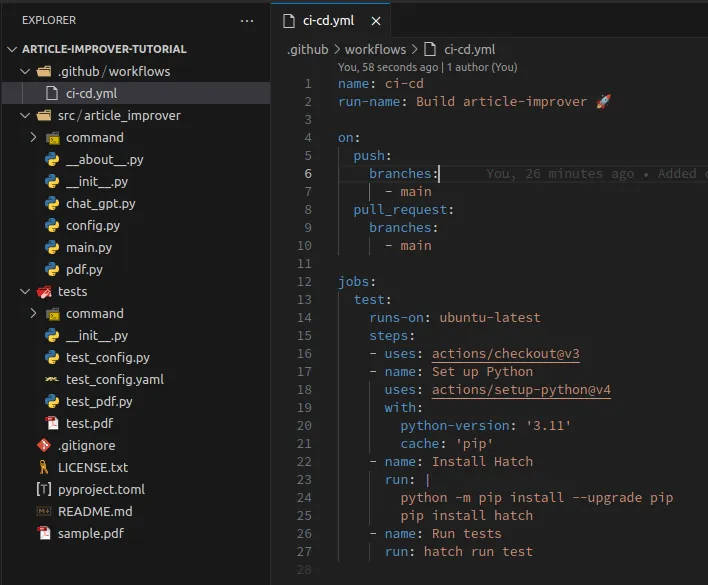
Changes from this section are available on GitHub.
3. Testing Test Job in GitHub
Let’s commit these changes and push them to the GitHub repository. You should be on the main branch or create a pull request to the main branch to see the triggered workflow.
After pushing changes, you can see your commit with different marks:
-
Circle mark — workflow is running. Loading...
-
Check mark — workflow has successfully finished. Loading...

-
Cross mark — workflow failed. Loading...

To see logs of workflow execution, you can click on the mark, and you will see the modal window like this:
Loading...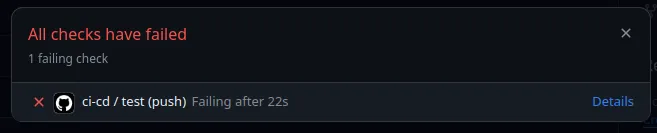
Simply click on the Details link and it will open logs.
Loading...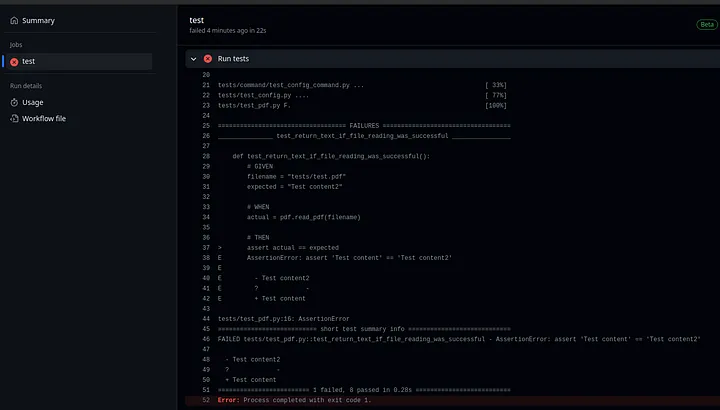
From the logs, we can see that I have broken tests to demonstrate how the workflow fails. Let me fix the tests and publsih the commit again. Workflow has passed.
Loading...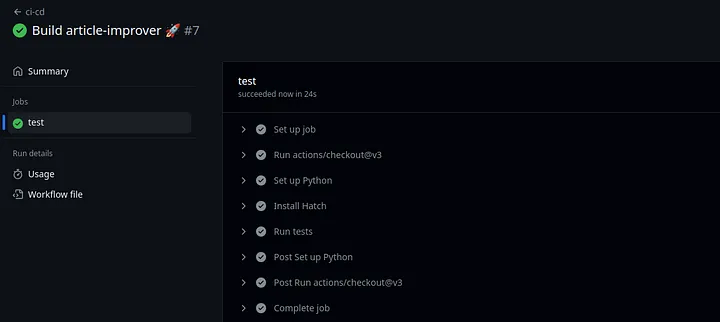
Here I added the CI part of CI/CD with running tests. Next, let’s add the CD part.
4. Build Job
Let’s modify our ci-cd.yml file and add the build job by replacing the current contents of ci-cd.yml file with the following:
1name: ci-cd
2run-name: Build article-improver 🚀
3
4on:
5  push:
6    branches:
7      - main
8  pull_request:
9    branches:
10      - main
11
12jobs:
13  test:
14    runs-on: ubuntu-latest
15    steps:
16    - uses: actions/checkout@v3
17    - name: Set up Python
18      uses: actions/setup-python@v4
19      with:
20        python-version: '3.11'
21        cache: 'pip'
22    - name: Install Hatch
23      run: |
24        python -m pip install --upgrade pip
25        pip install hatch
26    - name: Run tests
27      run: hatch run test
28  build:
29    runs-on: ubuntu-latest
30    needs: [test]
31    steps:
32    - uses: actions/checkout@v3
33    - name: Set up Python
34      uses: actions/setup-python@v4
35      with:
36        python-version: '3.11'
37        cache: 'pip'
38    - name: Install Hatch
39      run: |
40        python -m pip install --upgrade pip
41        pip install hatch
42    - name: Build package
43      run: hatch build
44    - uses: actions/upload-artifact@v4
45      with:
46        name: article-improver-dist
47        path: dist/*
build— the new job which will run after thetestjob, and it will create a distribution of ourarticle-improverpackage in the folderdist. After that, it will publish the artifact as the result of the job execution (I will show it later).needs: [test]— the statement which specifyies that thebuildjob should be executed only after thetestjob because by followingCI/CDprinciple we want to provide software for our clients only after continuous integration stage (checking that software works; running tests).name: Build package— the new step which packagesarticle-improverto thedistfolder.uses: actions/upload-artifact@v4— the new step which creates an artifact from thedistfolder. This artifact will be ready for downloading on the workflow page.
Artifact — an archive or binary file in which software has packaged and it is ready to use by software clients. Examples: zip archive, binary file, jar archive.
The file ci-cd.yml should looks like this:
Loading...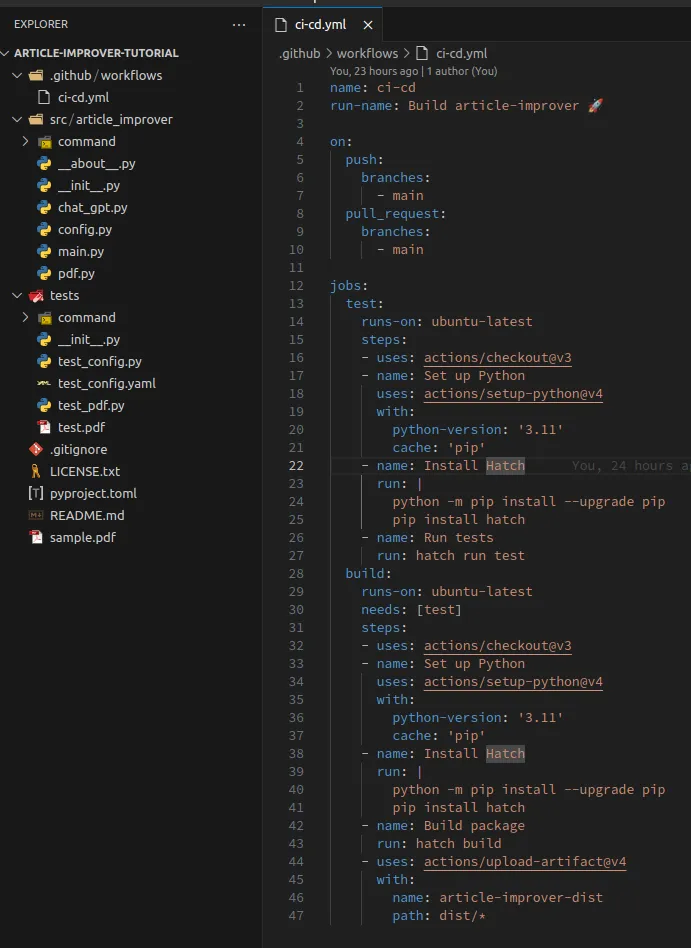
Let’s test how it works by pushing code to GitHub.
Loading...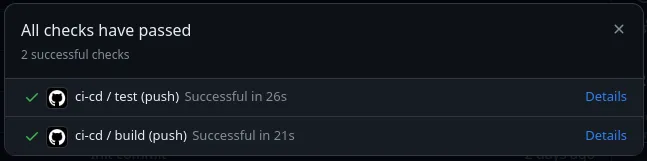
Let’s open the details page for these jobs by clicking on the Details button and next click on the Summary button in the top-left part of the screen.
Loading...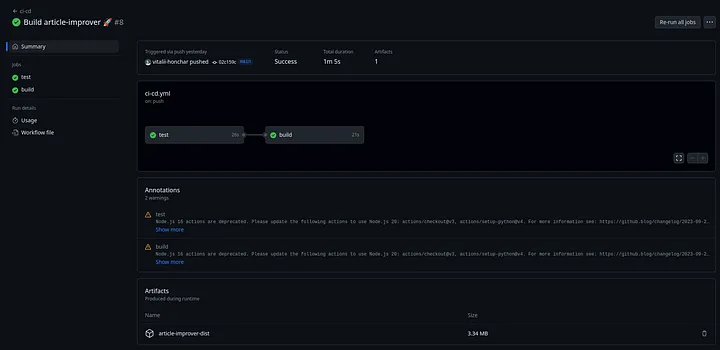
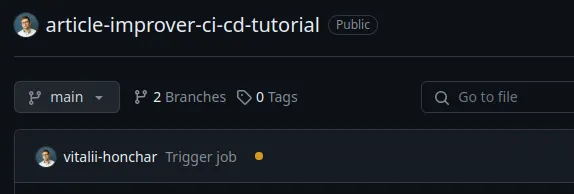
My workflow is available on GitHub.
- There is a visual representation of jobs and their execution order.
- At the bottom of the screen, there is a list of published artifacts from our jobs.
- An artifact,
article-improver-dist, is ready for download by our clients and can be installed on their machines.
While our clients can download artifact by looking for it in the GitHub Actions workflow, this is not an obvious way to do it because nobody wants to spend their time analyzing a GitHub repository. Let’s create a release stage.
5. Release Job
Let’s add the step to publish a release on GitHub by replacing the content of the ci-cd.yml file with the following:
1name: ci-cd
2run-name: Build article-improver 🚀
3
4on:
5  push:
6    branches:
7      - main
8    tags:
9      - '*'
10  pull_request:
11    branches:
12      - main
13
14jobs:
15  test:
16    runs-on: ubuntu-latest
17    steps:
18    - uses: actions/checkout@v3
19    - name: Set up Python
20      uses: actions/setup-python@v4
21      with:
22        python-version: '3.11'
23        cache: 'pip'
24    - name: Install Hatch
25      run: |
26        python -m pip install --upgrade pip
27        pip install hatch
28    - name: Run tests
29      run: hatch run test
30  build:
31    runs-on: ubuntu-latest
32    needs: [test]
33    steps:
34    - uses: actions/checkout@v3
35    - name: Set up Python
36      uses: actions/setup-python@v4
37      with:
38        python-version: '3.11'
39        cache: 'pip'
40    - name: Install Hatch
41      run: |
42        python -m pip install --upgrade pip
43        pip install hatch
44    - name: Build package
45      run: hatch build
46    - uses: actions/upload-artifact@v4
47      with:
48        name: article-improver-dist
49        path: dist/*
50  release:
51    runs-on: ubuntu-latest
52    needs: [build]
53    if: startsWith(github.ref, 'refs/tags/')
54    steps:
55    - uses: actions/checkout@v3
56    - uses: actions/download-artifact@v4
57      with:
58        name: article-improver-dist
59        path: article-improver-dist
60    - name: Generate Changelog
61      run: |
62        echo "# article-improver release 🚀" > ${{ github.workspace }}-CHANGELOG.txt
63        echo "" >> ${{ github.workspace }}-CHANGELOG.txt
64        echo "Test release for Medium article" >> ${{ github.workspace }}-CHANGELOG.txt
65        echo "" >> ${{ github.workspace }}-CHANGELOG.txt
66        echo "- Follow me on [Medium](https://vitalii-honchar.medium.com/) 🔥" >> ${{ github.workspace }}-CHANGELOG.txt
67        echo "- Connect with me on [LinkedIn](https://www.linkedin.com/in/vitaliihonchar/) 😎" >> ${{ github.workspace }}-CHANGELOG.txt
68    - name: Release
69      uses: softprops/action-gh-release@v1
70      with:
71        body_path: ${{ github.workspace }}-CHANGELOG.txt
72        files: article-improver-dist/*
New changes:
on.push.tags— this condition specifies that the workflow should be triggered on every tag push to GitHub.release— the job which publishes GitHub release.if: startsWith(github.ref, ‘refs/tags/’)— the statement which indicates that job should runs only on the publishing of new tags.uses: actions/download-artifact@v4— the step which downloads an artifact from thebuildjob. This step is necessary because jobs are running on different runners, so the file system from thebuildjob is not available for the file system for thereleasejob; that’s why we need to download an artifact published by thebuildjob.name: Generate Changelog— the step which creates a changelog for the release.name: Release— the step which publishes the release on GitHub.
The file should looks like this:
Loading...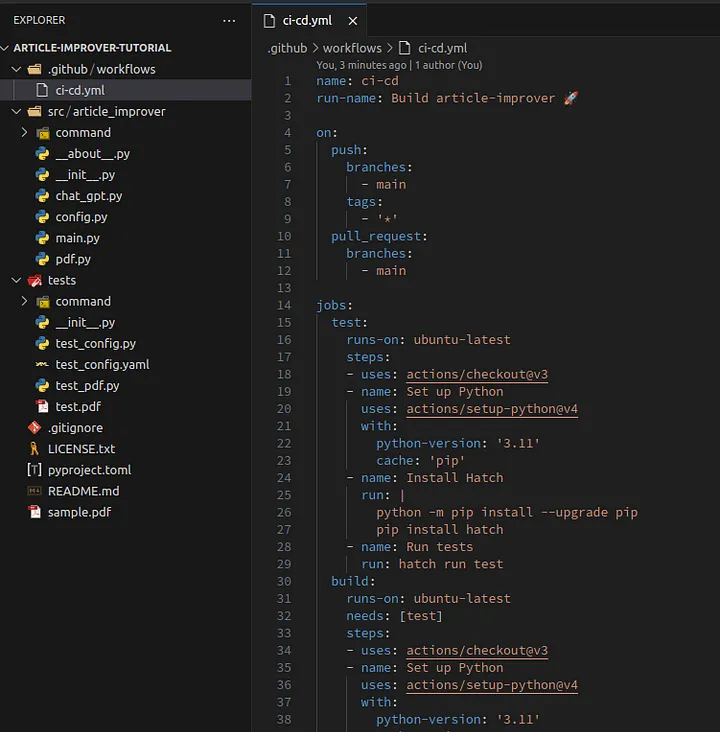
Before we will test these changes, we need to adjust GitHub Actions permissions in our repository. Please open the GitHub repository and click on the button Settings as shown in the screenshot below.
Loading...
Next, let’s click on the button Actions > General as shown in the screenshot below.
Loading...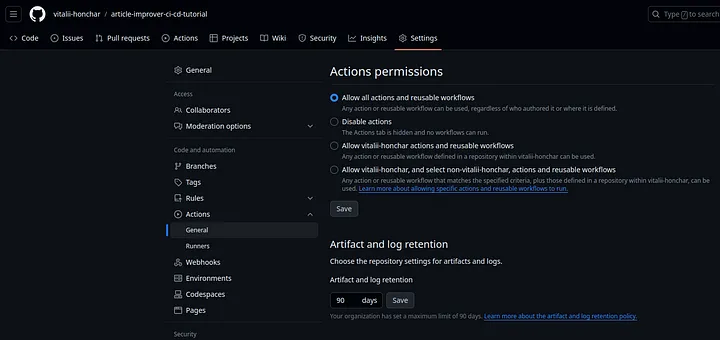
Scroll down the page to the Workflow permissions section, like this:
Loading...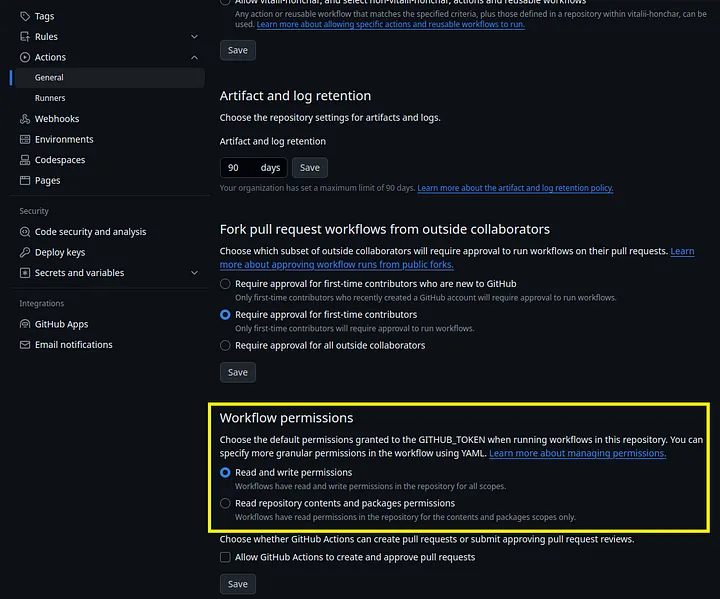
You should check the Read and write permissions radio button because by default GitHub Actions have only read permissions, but to publish the release we need write permissions as well.
After checking the Read and write permissions radio button as shown in the screenshow below we can test our GitHub Actions workflow.
- Push your changes to the GitHub repository
1git push origin main
- Create a new Git tag
1git tag v1.0.10
- Push a tag
1git push origin v1.0.10
- Let’s click on the
Actionsbutton in the GitHub repository Loading...
There is should be one running job for the Git tag v1.0.10. When job will finish the new release will be displayed on the Code page of the GitHub Repository as shown in the screenshot below.
Loading...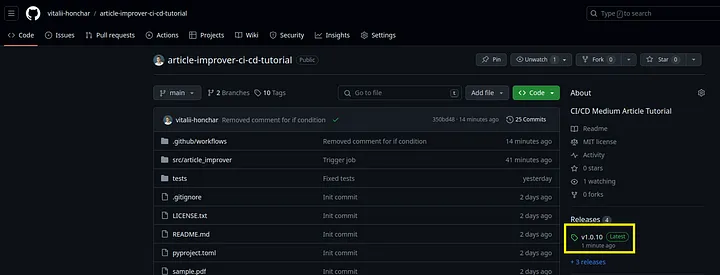
We can click on the release and see release notes and artifacts available to download.
Loading...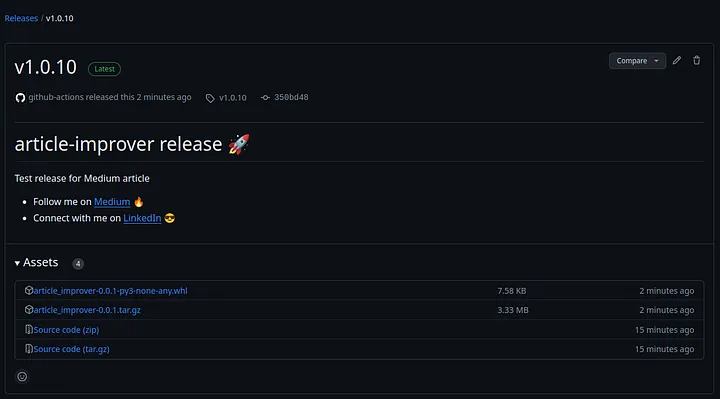
The content of this section is available on GitHub.
6. Continuous Delivery (CD)
We added the release job which publishes a release in the previous step and this is the continuous delivery (CD) in our case because we are developing CLI application and it’s enough for our users to get it. Our user can download wheel file from the release page as shown in the screenshot below.
Loading...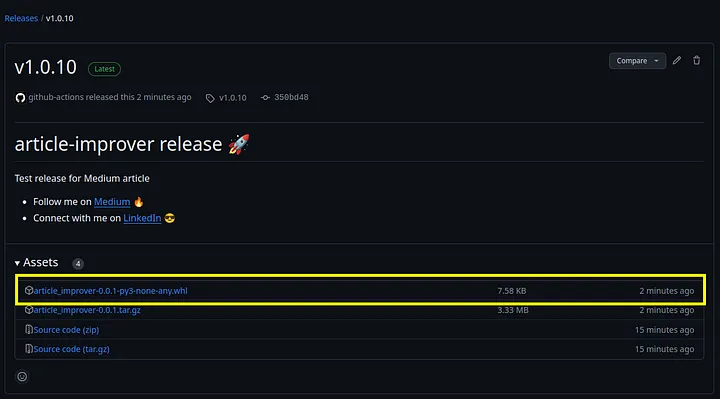
After that, user can install that file with the pip. For example:
1pip install article_improver-0.0.1-py3-none-any.whl
The result should be like this:
Loading...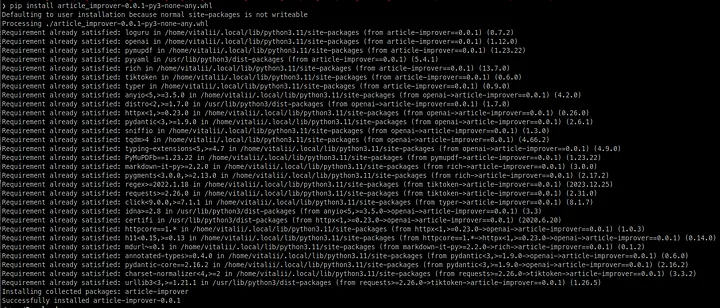
That’s it, article-improver is ready for usage:
Loading...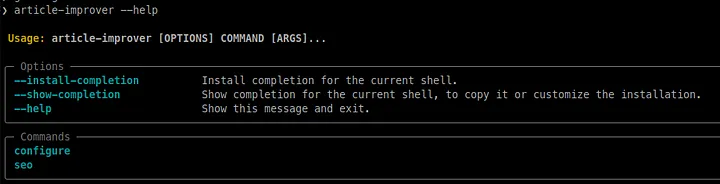
Of course, everything related to the delivery of a CLI application make sense only for CLI application because CD for server application should include the step for deployment of the software after creation of the release, but this is the topic for another article.
Conclusions
In this article, I explained the difference between CI and CD; also, I provided an example of building a CI/CD pipeline for a Python CLI application with GitHub Actions.
In next articles, I’m planning to finish the article-improver application and starting development of a Django application with the same functionality. Also, I will explain how to build CI/CD for server application and how to build an infrastructure for it.
📧 Stay Updated
Get weekly insights on backend development, architecture patterns, and startup building directly in your inbox.
Free • No spam • Unsubscribe anytime
Share this article
Related articles
LLM Prompt Evaluation with Python: A Practical Guide to Automated Testing
Learn how to evaluate LLM prompt quality using Python with practical examples from an open-source AI product research project. Discover automated testing techniques to ensure consistent, high-quality outputs from your AI applications while minimizing costs.
How I Built an AI-Powered YouTube Shorts Generator: From Long Videos to Viral Content
Complete technical guide to building an automated YouTube Shorts creator using Python, OpenAI Whisper, GPT-4, and ffmpeg. Includes full source code, architecture patterns, and performance optimizations for content creators and developers.
