Pipeline of Agents Pattern: Building Maintainable AI Workflows with LangGraph

Introduction
In the previous article How to Build a ReAct AI Agent for Cybersecurity Scanning with Python and LangGraph I explained how to build a simple ReAct Agent to scan a web target for vulnerabilities. But the scope of work for cyber security audits is bigger than just scanning. It includes:
- Scanning Stage - get information about possible vulnerabilities in the target.
- Attacking Stage - try to exploit vulnerabilities and prove our hypothesis from the scanning stage.
- Reporting Stage - create comprehensive report for company which requested audit to apply fixes.
And to build this I tried to go with simple graph first but then realized that this approach is not flexible and violates "Single Responsibility" from SOLID.
That's why I have built the pipeline of agents where each agent is responsible only for one thing and does it pretty well.
Pipeline of Agents
Loading...
Pipeline of Agents - is an architectural pattern that chains specialized AI agents in a sequential workflow, where each agent processes the output from the previous agent and passes refined data to the next. Unlike monolithic agents that try to do everything, pipeline agents follow single responsibility principle - each agent excels at one specific task.
Main characteristics of this pattern:
- Each agent has a single, specialized responsibility.
- Sequential execution with data flow - output from Agent N becomes input for Agent N + 1.
- Composable and modular - you can swap agents or change the pipeline order.
- State isolation - agents don't share internal state, only defined outputs.
- Failure handling
Why Use Pipeline of Agents?
Let's see with an example why we should use Pipeline of Agents. In my original implementation of Cyber Security AI Agent I didn't use it and the system was very hard to develop and maintain. Here is the code which builds a graph:
1def create_graph() -> CompiledStateGraph:
2    llm = ChatOpenAI(model="gpt-4o", temperature=0.3)
3
4    # tools
5    attack_tools = [ffuf_directory_scan, curl_tool, flexible_http_tool]
6    scan_tools = [ffuf_directory_scan]
7
8    llm_with_attack_tools = llm.bind_tools(attack_tools, parallel_tool_calls=True)
9    llm_with_scan_tools = llm.bind_tools(scan_tools, parallel_tool_calls=True)
10
11    # nodes init
12    process_tool_result_node = ProcessToolResultNode(llm=llm)
13    generate_report_node = GenerateReportNode(llm=llm)
14    scan_target_node = ScanTargetNode(llm_with_tools=llm_with_scan_tools)
15    attack_target_node = AttackTargetNode(llm_with_tools=llm_with_attack_tools)
16
17    # edges init
18    scan_tools_router = ToolRouterEdge(
19        origin_node="scan_target_node",
20        tools_type="scan",
21        end_node="attack_target_node",
22        tools_node="scan_tools",
23    )
24    attack_tools_router = ToolRouterEdge(
25        origin_node="attack_target_node",
26        tools_type="attack",
27        end_node="generate_report",
28        tools_node="attack_tools",
29    )
30
31    # graph init
32    builder = StateGraph(TargetScanState)
33
34    # nodes
35    builder.add_node("scan_target_node", scan_target_node)
36    builder.add_node("attack_target_node", attack_target_node)
37    builder.add_node("scan_tools", ToolNode(scan_tools))
38    builder.add_node("attack_tools", ToolNode(attack_tools))
39    builder.add_node(
40        "process_scan_results", process_tool_result_node.process_tool_results
41    )
42    builder.add_node(
43        "process_attack_results", process_tool_result_node.process_tool_results
44    )
45    builder.add_node("generate_report", generate_report_node.generate_report)
46
47    # edges
48    builder.add_edge(START, "scan_target_node")
49    builder.add_conditional_edges("scan_target_node", scan_tools_router)
50    builder.add_conditional_edges("attack_target_node", attack_tools_router)
51
52    builder.add_edge("scan_tools", "process_scan_results")
53    builder.add_edge("process_scan_results", "scan_target_node")
54
55    builder.add_edge("attack_tools", "process_attack_results")
56    builder.add_edge("process_attack_results", "attack_target_node")
57
58    builder.add_edge("generate_report", END)
59
60    # Add memory checkpointer for state persistence
61    memory = MemorySaver()
62    return builder.compile(checkpointer=memory)
Here I'm just creating a bunch of nodes with edges which conditionally jump from one node to another node. No single responsibility principle, no specialization. This code is hard to develop and hard to test because I can't test only the "scanning" stage of my system because there is only one way to test - launch the whole workflow and a bug in the "attacking" stage hides bugs from the "scanning" stage.
So LangGraph graphs should be small and simple like microservices for efficient development. That's why Pipeline of Agents is a good solution in my case because it provides me the possibility to split my big graph into:
- Scan Agent graph
- Attack Agent graph
Develop and test these 2 graphs in isolation and only after that build the whole pipeline for my Cyber Security Agent by combining 2 smaller agents.
High Level Design
Loading...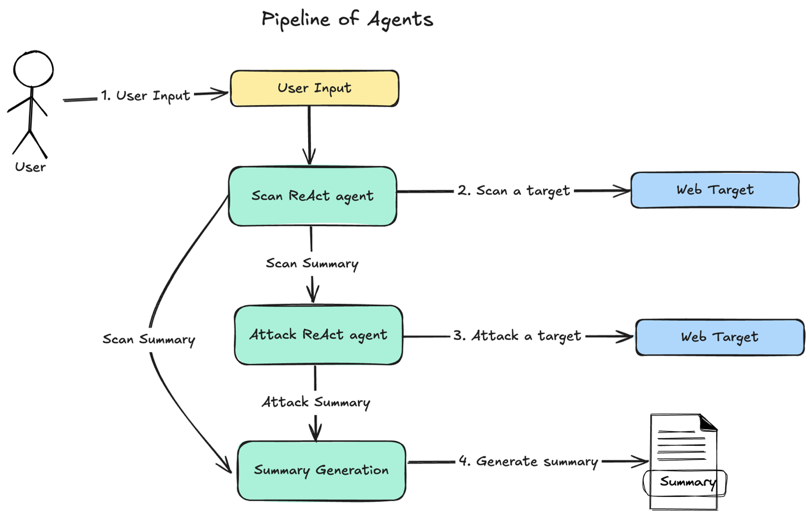
- User sends input information about a target.
Scan Agentscans a target and generates scan summary.Attack Agentattacks a target and generates attack summary.Summary Generationgenerates a final summary based on the scan and attack summaries.
Scan ReAct Agent
Loading...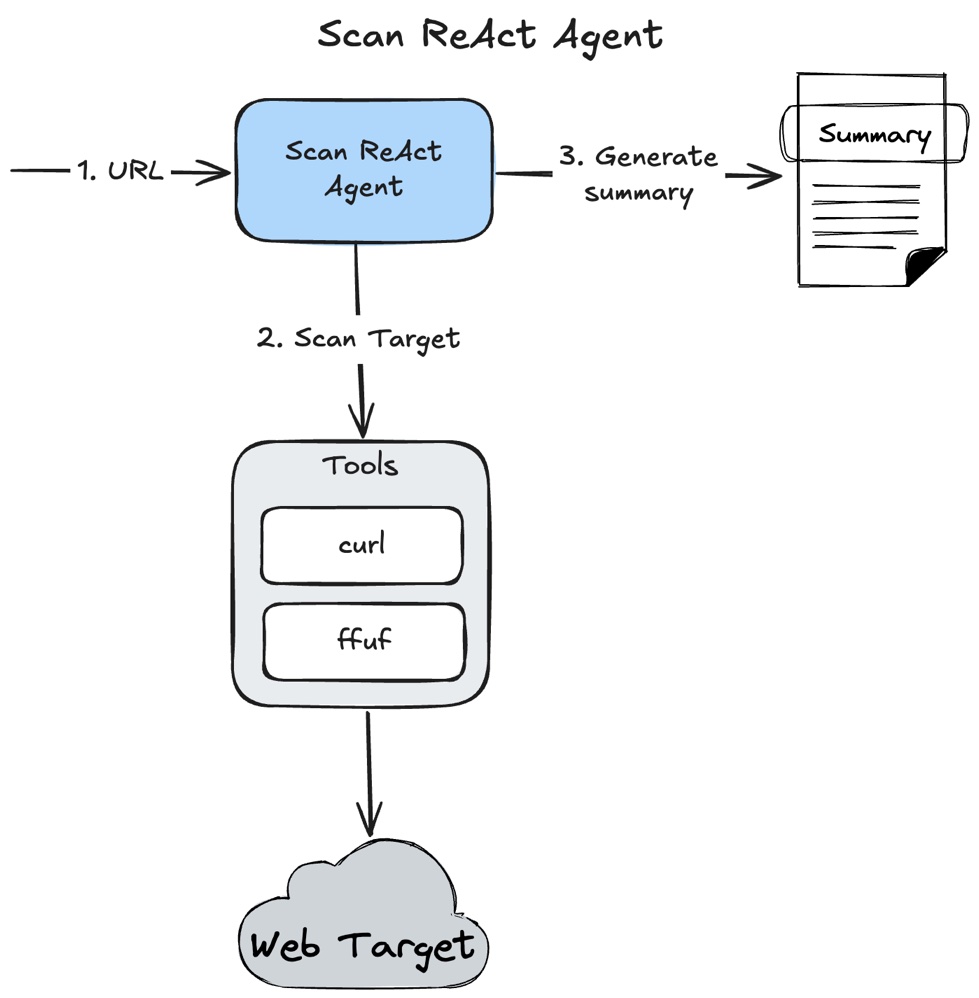
This Agent uses ReAct architecture with tools:
ffuf- for enumeration of possible endpoints.curl- for quick testing enumeration output or perform custom testing.
I fully covered ReAct pattern and this agent implementation in the How to Build a ReAct AI Agent for Cybersecurity Scanning with Python and LangGraph article.
Attack ReAct Agent
Loading...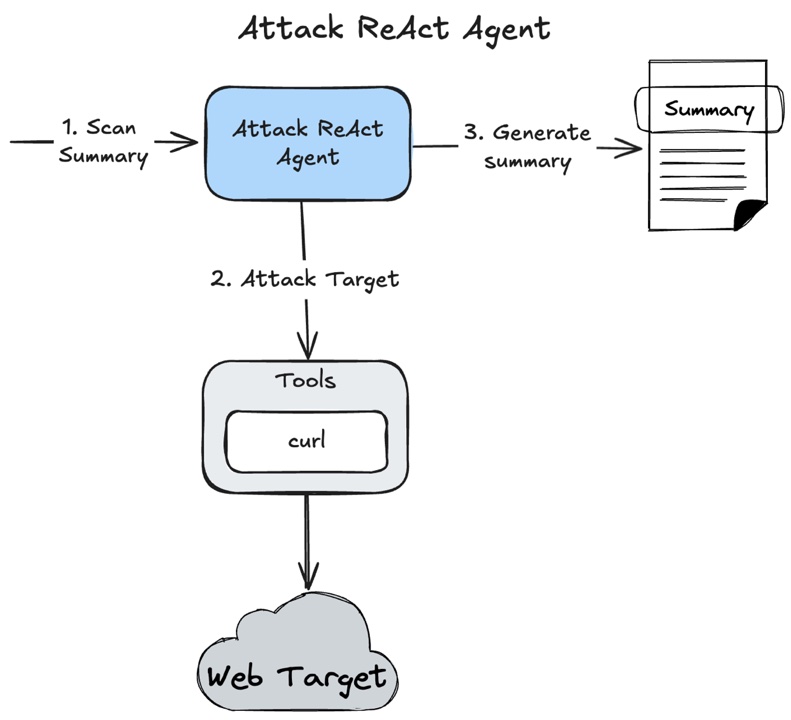
Attack Agent uses the same ReAct architecture and only curl tool to exploit vulnerabilities because I did it in the scope of a research project and if needed, other tools can be easily added.
Summary Generation
Loading...
Summary Generation - is a simple LLM API call without using any complex pattern.
Implementation
To implement this system I used:
- LangGraph
- Python
Source code is available on GitHub.
LangGraph Graph
Loading...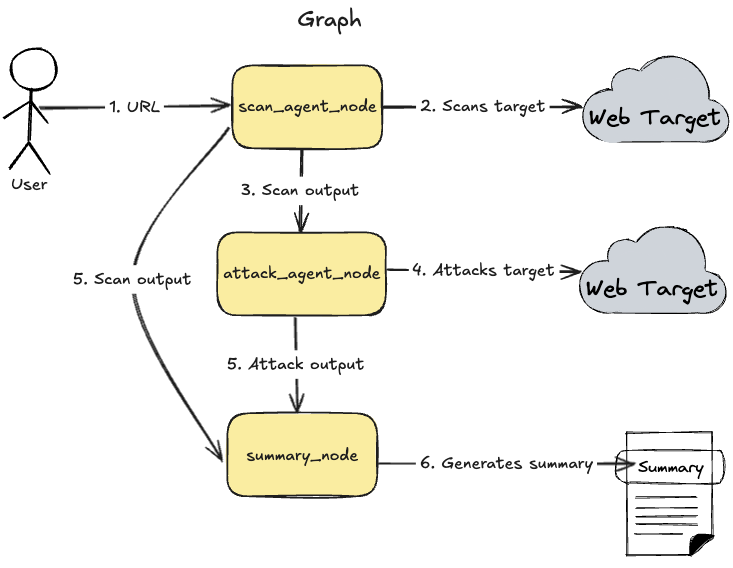
- User sends URL
scan_agent_nodeexecutes Scan Agent and performs web target scanning.scan_agent_nodeproduces scanning result as an output.attack_agent_nodeexecutes Attack Agent with an output fromscan_agent_nodeand performs target attack.summary_nodegenerates summary based on outputs fromscan_agent_nodeandattack_agent_node
There is code which builds this graph in Python (also available on GitHub):
1from langchain_openai import ChatOpenAI
2from langgraph.checkpoint.memory import MemorySaver
3from langgraph.graph import END, START, StateGraph
4from langgraph.graph.state import CompiledStateGraph
5
6from cybersecurity_agent.node import ScanAgentNode, AttackAgentNode, CybersecuritySummaryNode
7from cybersecurity_agent.state import CybersecurityAgentState
8
9
10def create_cybersecurity_graph(
11    scan_react_limit: int = 25,
12    scan_ffuf_limit: int = 2,
13    scan_curl_limit: int = 5,
14    attack_react_limit: int = 25,
15    attack_curl_limit: int = 10,
16) -> CompiledStateGraph:
17    llm = ChatOpenAI(model="gpt-4.1-2025-04-14", temperature=0.3)
18
19    # Use parameterized wrapper nodes with configurable limits
20    scan_agent_node = ScanAgentNode(
21        react_usage_limit=scan_react_limit,
22        ffuf_tool_limit=scan_ffuf_limit,
23        curl_tool_limit=scan_curl_limit,
24    )
25    attack_agent_node = AttackAgentNode(
26        react_usage_limit=attack_react_limit,
27        curl_tool_limit=attack_curl_limit,
28    )
29    cybersecurity_summary_node = CybersecuritySummaryNode(llm=llm)
30
31    # Build the graph
32    builder = StateGraph(CybersecurityAgentState)
33
34    # Add nodes that use compiled sub-graphs internally
35    builder.add_node("scan_agent", scan_agent_node)
36    builder.add_node("attack_agent", attack_agent_node)
37    builder.add_node("cybersecurity_summary", cybersecurity_summary_node)
38
39    # Define the workflow: scan -> attack -> summary
40    builder.add_edge(START, "scan_agent")
41    builder.add_edge("scan_agent", "attack_agent")
42    builder.add_edge("attack_agent", "cybersecurity_summary")
43    builder.add_edge("cybersecurity_summary", END)
44
45    return builder.compile(checkpointer=MemorySaver())
Passing State for Child Graphs
All my agents are built with LangGraph and are graphs. LangGraph provides the possibility to embed an external graph inside my graph but as far as I don't want to share the state of my parent graph with child graph I don't want to embed it. That's why I decided to build a node wrapper which will convert parent graph state to the child graph state and pass only required data for child graph execution.
This allows me to hide information and work only with the minimal amount of it. This is my parent graph state (see on GitHub):
1class CybersecurityAgentState(TypedDict):
2    target: Target
3    scan_summary: ScanAgentSummary | None
4    attack_summary: AttackReportSummary | None
5    cybersecurity_report: CybersecurityReport | None
And this is my child graph state:
1class AttackAgentState(ReActAgentState):
2    scan_summary: ScanAgentSummary
3    attack_summary: AttackReportSummary | None
To achieve my goal of hiding information I have built wrapper nodes for each agent.
Scan Agent Execution
Detailed implementation of the Scan Agent was described in How to Build a ReAct AI Agent for Cybersecurity Scanning with Python and LangGraph
Wrapper node for Scan Agent (see on GitHub):
1from langchain_core.runnables.config import RunnableConfig
2
3from scan_agent.graph import create_scan_graph
4from cybersecurity_agent.state import CybersecurityAgentState
5from agent_core.state import ReActUsage, Tools, ToolsUsage
6from agent_core.tool import CURL_TOOL, FFUF_TOOL
7
8
9class ScanAgentNode:
10    def __init__(
11        self,
12        react_usage_limit: int = 25,
13        ffuf_tool_limit: int = 2,
14        curl_tool_limit: int = 5,
15    ):
16        self.scan_graph = create_scan_graph()
17        self.react_usage_limit = react_usage_limit
18        self.ffuf_tool_limit = ffuf_tool_limit
19        self.curl_tool_limit = curl_tool_limit
20
21    async def __call__(self, state: CybersecurityAgentState) -> dict:
22        scan_state = {
23            "target": state["target"],
24            "usage": ReActUsage(limit=self.react_usage_limit),
25            "tools_usage": ToolsUsage(
26                limits={
27                    FFUF_TOOL.name: self.ffuf_tool_limit,
28                    CURL_TOOL.name: self.curl_tool_limit,
29                }
30            ),
31            "tools": Tools(tools=[FFUF_TOOL, CURL_TOOL]),
32        }
33
34        config = RunnableConfig(
35            max_concurrency=10,
36            recursion_limit=25,
37            configurable={"thread_id": f"scan_{hash(str(state['target']))}"},
38        )
39
40        final_state = await self.scan_graph.ainvoke(scan_state, config)
41
42        scan_summary = final_state.get("summary")
43
44        return {"scan_summary": scan_summary}
This node just creates a state for Scan Agent and executes it. Scan Agent doesn't know anything about parent state or even that it is part of a bigger flow. And even more, here I'm pretty flexible to define what tools and limits are allowed for Scan Agent.
Attack Agent Execution
Attack Agent node has similar code to the Scan Agent node (see on GitHub):
1from langchain_core.runnables.config import RunnableConfig
2
3from attack_agent.graph import create_attack_graph
4from cybersecurity_agent.state import CybersecurityAgentState
5from agent_core.state import ReActUsage, Tools, ToolsUsage
6from agent_core.tool import CURL_TOOL
7
8
9class AttackAgentNode:
10    def __init__(
11        self,
12        react_usage_limit: int = 25,
13        curl_tool_limit: int = 20,
14    ):
15        self.attack_graph = create_attack_graph()
16        self.react_usage_limit = react_usage_limit
17        self.curl_tool_limit = curl_tool_limit
18
19    async def __call__(self, state: CybersecurityAgentState) -> dict:
20        attack_state = {
21            "target": state["target"],
22            "scan_summary": state["scan_summary"],
23            "usage": ReActUsage(limit=self.react_usage_limit),
24            "tools_usage": ToolsUsage(
25                limits={
26                    CURL_TOOL.name: self.curl_tool_limit,
27                }
28            ),
29            "tools": Tools(tools=[CURL_TOOL]),
30        }
31
32        config = RunnableConfig(
33            max_concurrency=10,
34            recursion_limit=25,
35            configurable={"thread_id": f"attack_{hash(str(state['target']))}"},
36        )
37
38        final_state = await self.attack_graph.ainvoke(attack_state, config)
39        attack_summary = final_state.get("attack_summary")
40
41        return {"attack_summary": attack_summary}
Summary Generation
To generate a summary I decided to pass Scan and Attack Agents outputs because scan output may contain something which wasn't too useful for the attack process and attack agent simply ignored it. But in the summary I want to see all information from the cyber security assessment. (see on GitHub)
1import json
2from langchain_core.language_models import BaseChatModel
3from langchain_core.messages import SystemMessage
4
5from cybersecurity_agent.state import CybersecurityAgentState
6from cybersecurity_agent.state.cybersecurity_agent_state import CybersecurityReport
7
8CYBERSECURITY_SUMMARY_PROMPT = "Omitted for simplicity. Full prompt available on GitHub."
9
10class CybersecuritySummaryNode:
11    def __init__(self, llm: BaseChatModel):
12        self.structured_llm = llm.with_structured_output(CybersecurityReport)
13
14    def __call__(self, state: CybersecurityAgentState) -> dict:
15        target = state["target"]
16        scan_summary = state["scan_summary"]
17        attack_summary = state["attack_summary"]
18
19        system_prompt = CYBERSECURITY_SUMMARY_PROMPT.format(
20            target_url=target.url,
21            target_description=target.description,
22            target_type=target.type,
23            scan_summary=scan_summary.model_dump_json() if scan_summary else "No reconnaissance data available",
24            attack_summary=attack_summary.model_dump_json() if attack_summary else "No attack execution data available"
25        )
26
27        # Create a simple message to trigger the analysis
28        user_message = "Please analyze the provided reconnaissance and exploitation data to create a comprehensive cybersecurity assessment report."
29
30        prompt_messages = [
31            SystemMessage(content=system_prompt),
32            {"role": "user", "content": user_message}
33        ]
34
35        cybersecurity_report = self.structured_llm.invoke(prompt_messages)
36
37        return {"cybersecurity_report": cybersecurity_report}
Testing
To perform my testing I generated a vulnerable application with Claude Code which is available on GitHub. After that I simply executed my flow from Jupyter Notebook
Loading...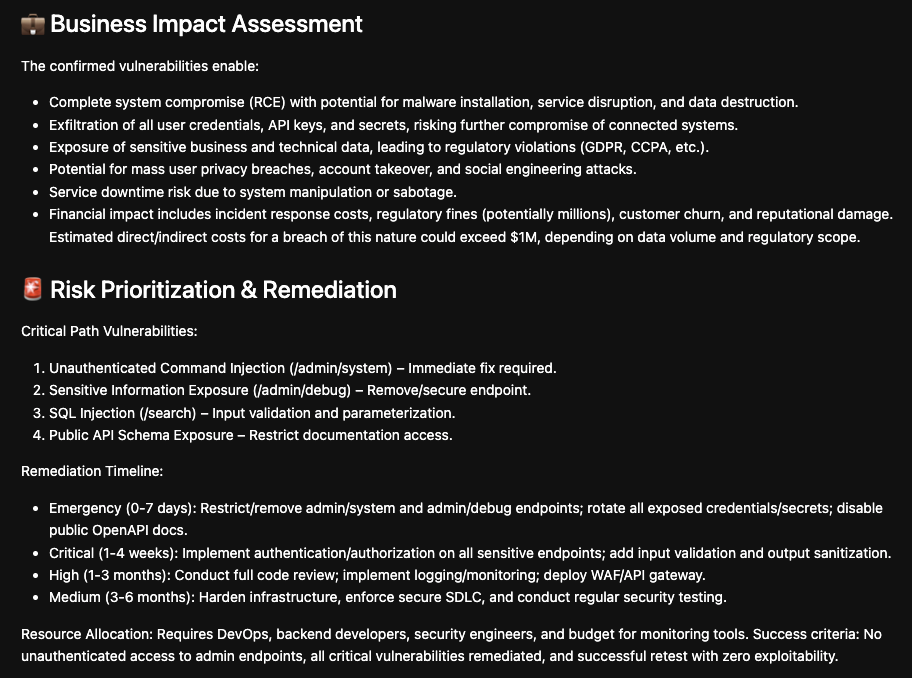
Result contains a lot of details useful for a business owner who asked to perform security testing for a system or security team.
Summary
In this article I explained how to build pipeline of agents by using LangGraph node wrappers in Python. As a result pipeline of agents provides a powerful system which has strict control of agent executions.
All code from this article is available on GitHub.
Previous article from the Cyber Security AI Agent development cycle is: How to Build a ReAct AI Agent for Cybersecurity Scanning with Python and LangGraph
📧 Stay Updated
Get weekly insights on backend development, architecture patterns, and startup building directly in your inbox.
Free • No spam • Unsubscribe anytime
Share this article
Related articles
Spec-Driven Development: How AI Coding Moves Beyond Vibe Coding
Spec-driven development turns AI coding from constant vibe coding into a structured workflow with specs, plans, tasks, and autonomous implementation.
LLM Prompt Evaluation with Python: A Practical Guide to Automated Testing
Learn how to evaluate LLM prompt quality using Python with practical examples from an open-source AI product research project. Discover automated testing techniques to ensure consistent, high-quality outputs from your AI applications while minimizing costs.
