High Load Infrastructure with Terraform

Introduction
In this post, I will highlight how to create high-load and highly available infrastructure with Terraform and AWS ASG.
AWS Auto Scaling Group
AWS Auto Scaling Group (ASG) is a managed service by AWS that automatically provisions EC2 instances based on the configuration and load.
It's a very handy component because we don't need to manually provision each EC2 instance separately. Instead, we configure AWS ASG, and it handles the provisioning for us.
More details are available in the AWS ASG documentation.
Infrastructure Architecture
Loading...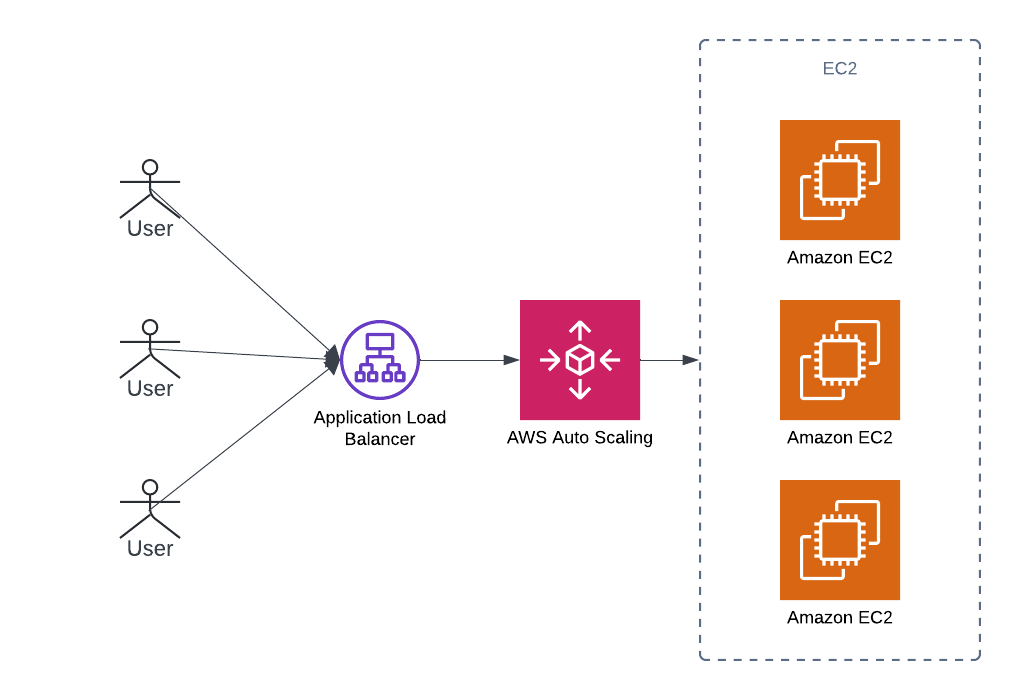
The infrastructure architecture contains these elements:
- Application Load Balancer: Accepts user traffic and routes it to the EC2 instances.
- AWS Auto Scaling Group (ASG): Controls the number of EC2 instances.
- AWS EC2 instances: Serve user requests.
If one of the EC2 instances becomes unhealthy, ASG will provision a replacement, and user requests will be handled without downtime.
With this architecture, we can achieve high load by provisioning additional EC2 instances through ASG configuration. However, true high availability can be achieved only by provisioning to multiple Availability Zones (AZs). While this example provisions EC2 instances in only one AZ for simplicity, using multiple AZs is recommended for high availability.
Terraform Project Structure
The Terraform project is very simple for this example and contains these files:
- main.tf: Main Terraform file declaring all AWS resources.
- user_data.sh: Script executed by AWS on EC2 instance startup.
- variables.tf: Terraform file with declared variables that the user should specify before applying.
- outputs.tf: Terraform file with outputs that will be printed to the console after applying.
Loading...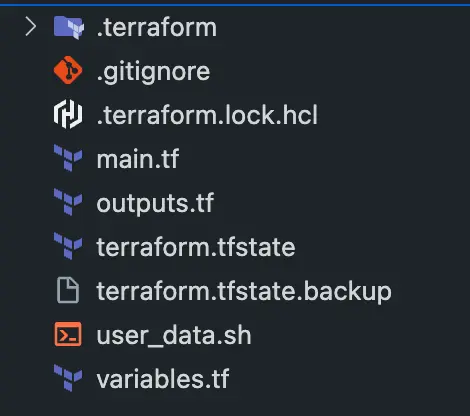
The project is available on GitHub.
main.tf
This file contains all the AWS resources that need to be provisioned.
1locals {
2  http_port    = 80
3  any_port     = 0
4  any_protocol = "-1"
5  tcp_protocol = "tcp"
6  https_port   = 443
7  all_ips      = ["0.0.0.0/0"]
8}
9
10provider "aws" {
11  region = "us-east-2"
12}
13
14data "aws_vpc" "default" {
15  default = true
16}
17
18data "aws_subnets" "default" {
19  filter {
20    name   = "vpc-id"
21    values = [data.aws_vpc.default.id]
22  }
23}
24
25resource "aws_launch_template" "cluster_lt" {
26  name_prefix   = "${var.cluster_name}-lt"
27  image_id      = "ami-0fb653ca2d3203ac1"
28  instance_type = "t2.micro"
29
30  user_data = base64encode(templatefile("user_data.sh", {
31    server_port  = var.server_port
32    cluster_name = var.cluster_name
33  }))
34
35  network_interfaces {
36    associate_public_ip_address = true
37    security_groups             = [aws_security_group.cluster.id]
38  }
39
40  tag_specifications {
41    resource_type = "instance"
42    tags = {
43      Name = "${var.cluster_name}-lt"
44    }
45  }
46}
47
48resource "aws_autoscaling_group" "cluster" {
49  name                = "${var.cluster_name}-asg"
50  vpc_zone_identifier = data.aws_subnets.default.ids
51  target_group_arns   = [aws_lb_target_group.asg.arn]
52  health_check_type   = "ELB"
53  min_size            = var.min_size
54  max_size            = var.max_size
55  min_elb_capacity    = var.min_size
56
57  launch_template {
58    id      = aws_launch_template.cluster_lt.id
59    version = "$Latest"
60  }
61
62  lifecycle {
63    create_before_destroy = true
64  }
65
66  tag {
67    key                 = "Name"
68    value               = "${var.cluster_name}-asg"
69    propagate_at_launch = true
70  }
71}
72
73resource "aws_security_group" "cluster" {
74  name = "${var.cluster_name}-sg"
75  ingress {
76    from_port   = 8080
77    to_port     = 8080
78    protocol    = "tcp"
79    cidr_blocks = ["0.0.0.0/0"]
80  }
81}
82
83resource "aws_lb" "cluster" {
84  name               = "${var.cluster_name}-lb"
85  load_balancer_type = "application"
86  subnets            = data.aws_subnets.default.ids
87  security_groups    = [aws_security_group.alb.id]
88}
89
90resource "aws_lb_listener" "http" {
91  load_balancer_arn = aws_lb.cluster.arn
92  port              = local.http_port
93  protocol          = "HTTP"
94  default_action {
95    type = "fixed-response"
96
97    fixed_response {
98      content_type = "text/plain"
99      message_body = "404: page not found"
100      status_code  = 404
101    }
102  }
103}
104
105resource "aws_security_group" "alb" {
106  name = "${var.cluster_name}-alb"
107}
108
109resource "aws_security_group_rule" "allow_http_inbound" {
110  type              = "ingress"
111  security_group_id = aws_security_group.alb.id
112
113  from_port   = local.http_port
114  to_port     = local.http_port
115  protocol    = local.tcp_protocol
116  cidr_blocks = local.all_ips
117}
118
119resource "aws_security_group_rule" "allow_all_outbound" {
120  type              = "egress"
121  security_group_id = aws_security_group.alb.id
122
123  from_port   = local.any_port
124  to_port     = local.any_port
125  protocol    = local.any_protocol
126  cidr_blocks = local.all_ips
127}
128
129resource "aws_lb_target_group" "asg" {
130  name     = "${var.cluster_name}-lb-target-group"
131  port     = var.server_port
132  protocol = "HTTP"
133  vpc_id   = data.aws_vpc.default.id
134
135  health_check {
136    path                = "/"
137    protocol            = "HTTP"
138    matcher             = "200"
139    interval            = 15
140    timeout             = 3
141    healthy_threshold   = 2
142    unhealthy_threshold = 2
143  }
144}
145
146resource "aws_lb_listener_rule" "asg" {
147  listener_arn = aws_lb_listener.http.arn
148  priority     = 100
149  condition {
150    path_pattern {
151      values = ["*"]
152    }
153  }
154  action {
155    type             = "forward"
156    target_group_arn = aws_lb_target_group.asg.arn
157  }
158}
user_data.sh
This file contains a script that will be executed by AWS on EC2 instance startup. Usually, it contains code that starts the application server.
1#!/bin/bash
2
3cat > index.html <<EOF
4<h1>${cluster_name}</h1>
5<p>Hello, World</p>
6EOF
7
8nohup busybox httpd -f -p ${server_port} &
variables.tf
This file contains variables that the user should specify before applying.
1variable "cluster_name" {
2  type        = string
3  description = "The name of the cluster"
4}
5
6variable "server_port" {
7  type        = number
8  description = "The port the server will use for HTTP requests"
9}
10
11variable "min_size" {
12  type        = number
13  description = "The minimum number of EC2 instances in the ASG"
14}
15
16variable "max_size" {
17  type        = number
18  description = "The maximum number of EC2 instances in the ASG"
19}
outputs.tf
This file contains outputs that will be printed to the console after applying.
1output "alb_dns_name" {
2  value       = aws_lb.cluster.dns_name
3  description = "The domain name of the load balancer"
4}
5
6output "asg_name" {
7  value       = aws_autoscaling_group.cluster.name
8  description = "The name of the Auto Scaling Group"
9}
Apply Terraform
To provision the infrastructure, we need to apply the Terraform project using the command "terraform apply". The result of its execution will be shown in the next screenshot.
Loading...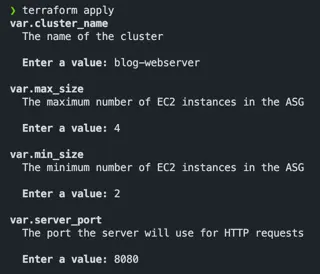
After specifying the required variable values and typing "yes" Terraform will provision all specified resources and return the outputs, as shown in the next screenshot.
Loading...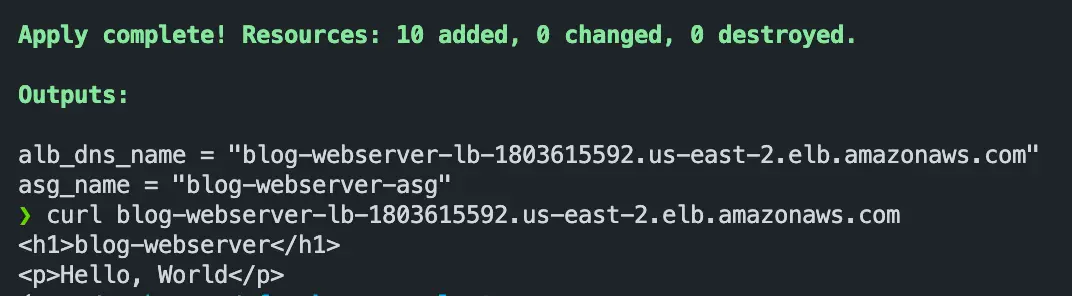
Conclusions
Loading...
In this article, I provided Terraform code to provision high-load infrastructure utilizing AWS Auto Scaling Groups.
Additionally, the code is available on GitHub.
📧 Stay Updated
Get weekly insights on backend development, architecture patterns, and startup building directly in your inbox.
Free • No spam • Unsubscribe anytime
Share this article
Related articles
The Production-Grade Infrastructure Checklist
A practical checklist for building production-grade infrastructure—based on the Terraform Up & Running book. Covers security, scaling, monitoring, and more.
Getting Started with Terraform
Learn Terraform basics with a hands-on AWS EC2 example. Discover the benefits of Infrastructure as Code and why Terraform is the industry-standard IaC tool.
